
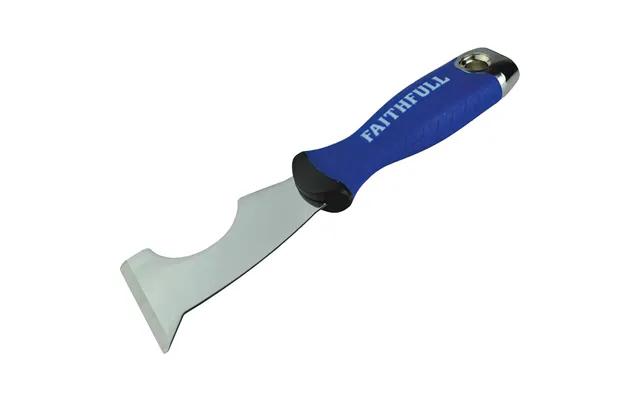
Paint Edgers price list
Last updated Friday, Sep 18, 2026
| Paint Edgers | Price |
|---|---|
| Faithfull Soft Grip Decorators 4-in-1 Tool | £6.49 |
| Faithfull Soft Grip Decorators 4-in-1 Tool | £6.49 |




Loading...
Last updated Friday, Sep 18, 2026
| Paint Edgers | Price |
|---|---|
| Faithfull Soft Grip Decorators 4-in-1 Tool | £6.49 |
| Faithfull Soft Grip Decorators 4-in-1 Tool | £6.49 |
Ever tried painting a room and ended up with wobbly lines along the ceiling or trim? A paint edger is like training wheels for a paintbrush — it keeps you steady, helps you cut in faster, and often beats the time and frustration of taping every corner. Whether you’re refreshing a small powder room or tackling the living room, the right edger can shave hours off a job and give you crisp, paint-store-quality edges without calling in a pro.
Pad edgers use a replaceable foam or fabric pad that you saturate with paint and glide along trim or ceilings. They’re great for straight stretches of wall and work well with latex paints. Think of them as the core tool for most homeowners: lightweight, easy to control, and inexpensive to replace when worn out.
Wheel-and-shield edgers combine a small guide wheel and a protective shield to keep paint off ceilings or adjacent surfaces. The wheel runs along the wall, while the shield blocks stray paint. If you prefer a mechanical guide to keep a steady line, this design feels like painting with training rails under your hands.
Corners are where mistakes hide. Corner rollers are specialized rollers shaped to fit inside a 90-degree angle so you can paint two planes at once. They speed up corner work and reduce the need for a perfect freehand cut-in, making them a smart add-on for rooms with lots of corners or crown molding.
Electric paint edgers or battery-powered models bring more speed and a steady flow of paint from a reservoir. They’re handy when you’ve got multiple rooms or large walls because they reduce the need to reload as often. Think of them as the power tools of cutting-in: a little heavier, but they make high-volume work feel easier.
For trim that’s narrow or for fiddly spots around doorknobs and light switches, mini edgers and angled sash brushes are indispensable. They let you finish details you’d struggle with using a standard pad without resorting to tape.
Pad width typically ranges from about 1.5 to 4 inches, with common home-use sizes around 2 to 3 inches. Foam pads lay down paint smoothly, while velour or fabric pads hold more paint and can give a slightly smoother finish. Match pad type to the paint sheen and surface — semi-gloss and satin like smoother pads, while flat paint can tolerate foam.
Handles often vary between 12 and 24 inches. A shorter handle gives better control for tight spaces; a longer or extendable handle lets you reach ceilings and taller walls without a ladder. Look for ergonomic grips — you’ll thank yourself halfway through a large room.
Some edgers have small reservoirs that hold roughly 6 to 12 fluid ounces, while battery-powered models may store a little more. More reservoir capacity means fewer refills, which is convenient on big jobs. However, larger tanks can add weight, so balance capacity with comfort.
The quality of the shield and guide wheel determines how clean your line will be. A well-designed shield keeps paint from splattering onto ceilings or adjacent trim, and a smooth-rolling guide makes it easier to follow corners and edges precisely.
Most edgers work with water-based latex paints, but if you plan to use oil-based paints or textured coatings, check manufacturer guidance. Some pads and reservoirs may clog or wear faster with thicker or solvent-based products.
Shur-Line has been a go-to for many DIYers thanks to simple, reliable edgers with replaceable pads and shields. Their products tend to be affordable and widely available, making them a safe bet if you want dependable performance without a big investment.
Wagner often enters the conversation when people want a powered option for speed. Their electric and battery tools can be more expensive, but they’re designed with higher throughput in mind — handy if you’re refreshing an entire home or doing rental turnovers.
Purdy and Wooster are names that show up with painters who prioritize durability and finish quality. While their products can be pricier, they’re built for regular, heavy use and often have pads and parts that hold up better over time.
There are plenty of no-name or store-brand edgers priced for casual DIYers. If you only plan to use an edger once or twice a year, these can be a practical choice — just expect to replace pads more often or upgrade if you run into frequent jobs.
Start by cleaning the trim and walls. Remove dust, cobwebs, and grease spots so paint adheres properly. Use lightweight sandpaper on rough trim and a damp cloth on dusty surfaces. Preparation is the stuff that separates a weekend hack from a professional-looking finish.
Saturate the pad evenly — you want enough paint to glide, not enough to drip. If your edger has a reservoir, fill it to the recommended level (often around 6 to 12 fl oz for handheld models). If you overfill, you’ll spend more time wiping drips than painting.
Keep a light but consistent pressure and move at an even pace. It’s like writing with a marker: press too hard and you smudge, move too fast and you skip. Keep the guide wheel or shield flush against the surface and correct any mistakes immediately with a small brush before the paint skins over.
Once you’ve edged around a section, roll the adjacent area with a standard roller to blend the cut-in. This prevents lap marks and ensures the sheen and texture match across the wall.
Clean pads and reservoirs right away. For latex paints, warm water and mild soap usually do the trick; for oil-based paints, you’ll need the appropriate solvent. Make sure everything is dry before storing — damp pads can mold, and residual solvent can gum up moving parts.
Painter’s tape still has its place. For delicate surfaces, very uneven lines, or when you need absolute, guaranteed protection for adjacent surfaces (like glass or intricate moldings), tape is a safe choice. That said, edgers are faster and reduce prep time for most standard trim and ceiling lines. If you’re short on time but want a clean line, try an edger first — you can always touch up small mistakes with a slim sash brush.
Keep spare pads on hand in different materials and widths. Having a foam pad for flat paint and a velour pad for smoother finishes lets you switch depending on the paint sheen you’re using. It’s like swapping golf clubs: each one has a purpose and helps you get the best result for the shot at hand.
Extra shields and wheel guards can extend what your edger can do. Some shields are better suited to baseboards, others to crown moldings. Consider the trim profiles in your house when choosing accessories so each corner and profile gets the right tool.
An extendable handle turns an edger into a ceiling tool without climbing a ladder. Look for poles that lock at common ranges like 24 to 60 inches to reach standard eight-to-ten-foot ceilings comfortably. Angled handles also help with overhead control, reducing wrist fatigue on large jobs.
Treat your edger like a small engine: clean it, dry it, and maintain it. Rinse pads completely between coats, and flush reservoir systems if the model supports it. Replace worn seals or pads promptly — a little upkeep now avoids frustration later and keeps edges crisp for years.
If you’re painting one room, a $10 to $25 pad edger with replacement pads can be all you need. For homeowners doing several rooms or flipping properties, a $50 to $150 powered unit may pay for itself in saved time. Pros and frequent DIYers may invest $100 or more in high-end brands for durability and better parts. Think about how often you’ll use the tool and pick accordingly — sometimes the mid-range model is the sweet spot for cost versus performance.
Comparison sites and price trackers are handy when hunting for deals. Look for models with the features you need — reservoir size, pad types, and handle length — then compare warranties and replacement-part availability. Don’t forget to factor in the ongoing cost of replacement pads or brushes when you’re comparing the lifetime cost of different systems.
Paint edgers are a small investment that can make a big difference in the speed and quality of your painting projects. They’re especially valuable if you want a fast, neat job without the time sink of meticulous taping. Select the type that fits your project size and comfort level, keep spare pads handy, and practice a bit on scrap wood or an unseen wall until you find the rhythm. Once you do, painting the next room will feel less like work and more like a satisfying home upgrade.
Choosing the right paint edger comes down to the scale of your project, your budget, and how much you value speed versus absolute perfection. From foam pad edgers that are cheap and cheerful to battery-powered tools that hum through an entire house, there’s a tool that matches every need. With the right technique, a couple of replacement pads, and a little patience, you can achieve clean, crisp lines that elevate any paint job — and enjoy the process along the way.